How to Make a Continuous Section Break in Word
When you write text in Microsoft Word you have numerous formatting options to choose from. Text presented in different format sizes and styles can make your document easier to read unlike text that is not formatted. Section break for instance can divide your document into sections by creating a page break between sections. In this article we will show you how to insert a continuous section break in Word and how to remove it.
What are the 4 types of section breaks?
There are 4 types of section breaks and one of them is a Continuous section break. Others are Next Page, Even Page, Odd Page. Whereas continuous section break starts a new section on the same page, next page section break starts a new section at the next page obviously. Even page section break is used to start a new section on the next even-numbered page, and the odd page section break starts a new section at the odd page section break.
Why is a section break useful?
A section break separates only the part of the text which you want to change in terms of the layout and formatting. Here are some specific examples when inserting a (continuous) section break can be useful:
- When you want to present a part of the text in two-columns but don't want to have the whole document presented in two columns.
- Using different page numbers throughout the Word document is possible if you separate the sections with a section break. So you can use roman numerals, Arabic numerals etc.
- When you write a book, you can use a section break at the beginning of every chapter so each chapter starts with the page number 1.
How to insert a continuous section break in Word 2016
Depending on the Word version you have, the ribbon interface can differ and thus the steps for finding an option to insert a continuous section break. In older versions of Word, you had to click on the Insert menu, then on Break in order to find the option to choose the section break type.
In newer versions of Word, including Word 2016, the steps go like this:
- Place the cursor exactly where you want to insert a continuous section break.
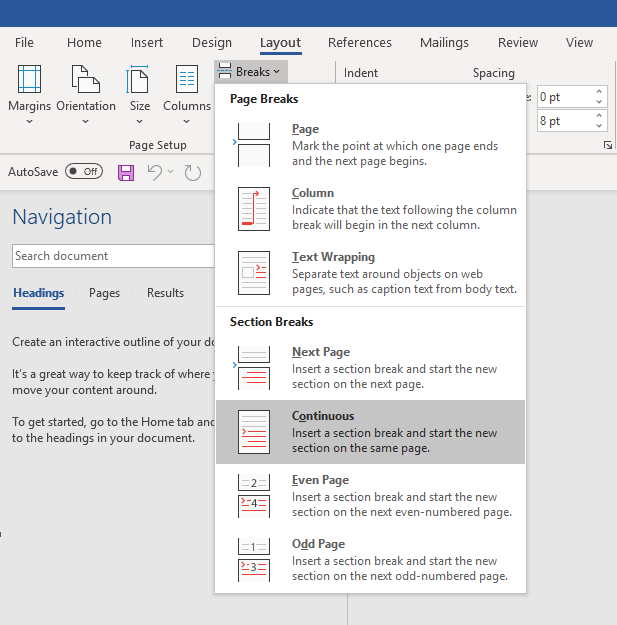
- Click on the Page Layout (Layout) tab.
- In the Page Setup tab, click on Breaks.
- Select Continuous from the Section Breaks list.
A continuous section break can be useful if you want to have two columns of text above the normal one column paragraph. This is particularly convenient when you want to insert images in the text. To set up the text to be shown in two columns above the one normal paragraph, insert a continuous section break and then follow these steps:
- Click at the beginning of text which you want to present in two columns.
- Insert a continuous section break there by following the steps above.
- Click at the end of the text you want to present in two columns and insert a continuous section break there, as well.
- Finally, click on Columns button in the Layout menu and select Two columns.
If you use only these steps for inserting a two-column layout without inserting a continuous section break, the whole document will be in two-column layout. By following these steps you will have only specific part of the text presented in two columns.
Section break shortcut

There isn't a default keyboard shortcut for inserting a section break but there is a way to customize it.
- Go to the File menu and click on Options.
- Click on Customize Ribbon tab and then click on the Customize button next to Keyboard shortcuts.
- In the Categories drop-down menu select All Commands.
- Select InsertSectionBreak in the Commands drop-down menu.
- In the field Press new shortcut key type your preferred keyboard combination. You can choose whatever keys you like.
- Click on the Assign button.
How to view section breaks in Word
When you insert a continuous section break in Word you may be confused because you don't see any changes. The thing is, all these layout options such as page breaks, section breaks are invisible by default. If you want to see them, you can of course make them visible.
- Click on the Home menu.
- In the Paragraph section click on this sign 
Once you click on it you will see that sign in the document, exactly where are the section breaks. If you want to hide them just click on that sign again.
How to remove all section breaks in Word
The easiest way to delete a section break is to use the steps above to show the signs where the section break is placed. Once you select each section break you just need to press the Delete button. However, it can be time consuming to remove all section breaks manually. Unfortunately, Word doesn't have that option to remove all section breaks at once but there are some workaround tools such as Kutools to help you out.
If you delete section breaks in several places in the document, have in mind that the text before and after the section break will have the same formatting. It will actually have the formatting of the section that was placed after the section break.
waldroupspich1973.blogspot.com
Source: https://www.pdfconverter.com/resources/blog/insert-continuous-section-break-word
0 Response to "How to Make a Continuous Section Break in Word"
Post a Comment